Messing around with ConstraintLayout

ConstraintLayout is Android’s latest layout element for super lazy developers who want to design layouts without having to write xml. It makes things “easier than ever to build an Android UI” as per the release notes.

First, you need to update AS to 2.2. Preview 3 is available now on canary channel. You also need to add the Constraint Library to project dependencies:

compile 'com.android.support.constraint:constraint-layout:1.0.0-alpha1'

Now just drag and drop the new layout, or even right click any existing layout to convert it to the ContraintLayout.convert_relative_to_constraint

After adding views, if they are not correctly constraints to surrounding views, the layout editor notifies you:

view_not_constrained

The layout editor has a feature called Autoconnect which tries to automatically connects the view to surrounding constraints, be it layout border or other views, as you move them in the editor.

autoconnect_constraint_layout

This walkthrough offer more deep understanding for ConstraintLayout. Very promising in my opinion but the real challenge would be with legacy code and how to convert it.

“Game of Life” on Android

glider_spaceship_game_of_life

Glider spaceship

Game of Life is a cellular automaton that was invented by Mathematician John Conway. It consists of a 2-D grid that contains cells. Each cell can have two states, dead or alive according to a set of rules: (copied from Wikipedia)

Any live cell with fewer than two live neighbors dies, as if caused by under-population.
Any live cell with two or three live neighbors lives on to the next generation.
Any live cell with more than three live neighbors dies, as if by over-population.
Any dead cell with exactly three live neighbors becomes a live cell, as if by reproduction.

I translated these rules to the following code:

/**
     * Get new state for the current cell
     * @param aliveNeighborsCount
     * @param currentCellState
     * @return
     */
    public LifeState getNewState(int aliveNeighborsCount, LifeState currentCellState) {

        // Alive with less than two or more than three dies.
        // Dead with less than two or more than three remains dead
        if (aliveNeighborsCount < 2 || aliveNeighborsCount > 3) {
            return LifeState.DEAD;
        }

        // Dead with two is still dead.
        // Alive with two remains alive
        else if (aliveNeighborsCount == 2) {
            return currentCellState;
        }

        // Dead with three becomes alive
        // Alive with three remains alive
        else {  //if (aliveNeighborsCount == 3)
            return LifeState.ALIVE;
        }
    }

I made a sample app for a 20×20 grid following such rules. That app follows MVP architecture and uses multiple third party libraries like dagger 2, butter knife, mockito and others.

Github: https://github.com/minafayek/GameOfLife

Integrating Lokali.se to your Android app

lokalise_logoLokali.se is a nice tool that helps you, obviously, localize you app or website and support as many languages as wanted without the hassle of having to maintain that locally or handling string files conflicts that occur because of multiple project contributors.

After setting your project’s account on Lokali.se you can start adding keys and their corresponding values in different languages. You can also link them to screen shots to give you a visual feel of where these values actually exist.

Having different modules in the project, I used the “tag” property to classify the strings according to modules they belong to. Later, will use this tag to download each string file to its corresponding folder in the module it belongs to.

In this script, written in Ruby (sadly enough), I’ll show how to update the strings in different languages folders and in different modules in your Android project. I tried to make it as generic as possible.

Script:

#!/usr/bin/env ruby

require 'json'
require 'fileutils'

LOKALISE_API_TOKEN="68f7dd06fd8168144cc87f0f6f109b1372ef1457"
LOKALISE_PROJECT_ID="50279272569651a49bf3e7.17958582"
INNER_PATH="/src/main/res/values"
PATH_SUFFIX="/strings.xml"
modules=ARGV[0]
root=ARGV[1]

modules.split(",").each{ |modu|

    tag = "['" + "#{modu}" + "']"

    query = 'curl -X POST "https://lokali.se/api/project/export" --data "api_token=' + LOKALISE_API_TOKEN + '" --data "id=' + LOKALISE_PROJECT_ID + '" --data "type=xml" --data "use_original=0" --data "tags=' + tag + '" --data "bundle_filename=%PROJECT_NAME%-Locale.zip" --data "bundle_structure=%LANG_ISO%/strings.%FORMAT%"'
    result = `#{query}`

    file = JSON.parse(result)["bundle"]["file"]
    download = 'curl -O "https://lokali.se/' + file + '"'

    `#{download}`

    `unzip My_App-Locale.zip -d My_App-Locale/`

       #Get the directory list
       directories = Dir["My_App-Locale/*"]

       #Loop on folders, split to get the names which are the languages e.g (en, de...) and copy content to corresponding strings file
       directories.each do |directory|
              language = directory.split('/').last

              #first check if it's english then we need to remove the language part from path to get "values" only, otherwise we should add "-" and then language (for e.g: values-de)
              l = "#{language}"
              l = (l == "en") ? (l = "") : (l = "-" + "#{language}")


              folderpath = "#{root}" + "#{modu}" + "#{INNER_PATH}" + "#{l}"
              filepath = "#{folderpath}" + "#{PATH_SUFFIX}"

              FileUtils.mkdir_p(folderpath) unless File.exists?(filepath)

              `mv My_App-Locale/#{language}/strings.xml  #{filepath}`
       end

   # `rm -rf My_App-Locale.zip`
   # `rm -rf My_App-Locale/`
   # `rm -rf __MACOSX`
    }

Now let’s breakdown the script:

First I defined some constants and some arguments that we pass. The first argument is a comma-separated string of the project modules names and the second is the project’s root directory (will show later how to pass them):

LOKALISE_API_TOKEN="68f7dd06fd8168144cc87f0f6f109b1372ef1457"
LOKALISE_PROJECT_ID="50279272569651a49bf3e7.17958582"
INNER_PATH="/src/main/res/values"
PATH_SUFFIX="/strings.xml"
modules=ARGV[0]
root=ARGV[1]

Next, we need to loop on each module in the passed string to execute the curl command, download a .zip file that has our .xml files, and unzip it to local folder. The query we use has the API token and the project id we got from lokali.se. It also has the project name and the “tag” which is the current module in the loop.

modules.split(",").each{ |modu|

    tag = "['" + "#{modu}" + "']"

    query = 'curl -X POST "https://lokali.se/api/project/export" --data "api_token=' + LOKALISE_API_TOKEN + '" --data "id=' + LOKALISE_PROJECT_ID + '" --data "type=xml" --data "use_original=0" --data "tags=' + tag + '" --data "bundle_filename=%PROJECT_NAME%-Locale.zip" --data "bundle_structure=%LANG_ISO%/strings.%FORMAT%"'
    result = `#{query}`

    file = JSON.parse(result)["bundle"]["file"]
    download = 'curl -O "https://lokali.se/' + file + '"'

    `#{download}`

    `unzip My_App-Locale.zip -d My_App-Locale/`

The downloaded file to My_App-Locale/ directory will have a folder for each language your app supports on lokali.se, with every folder having a strings file in it:

lokalise_file_unizipped.png

Now that we have these folders, we need to loop on them to put each file where it belongs. English in “values”, German in “values-de” etc.. If the folder doesn’t exist, the script will create it.

In case the language is not English (i.e: folder name is not “en”) we add a “-” then the folder name.

#Get the directory list
       directories = Dir["My_App-Locale/*"]

       #Loop on folders, split to get the names which are the languages e.g (en, de...) and copy content to corresponding strings file
       directories.each do |directory|
              language = directory.split('/').last

              #first check if it's english then we need to remove the language part from path to get "values" only, otherwise we should add "-" and then language (for e.g: values-de)
              l = "#{language}"
              l = (l == "en") ? (l = "") : (l = "-" + "#{language}")


              folderpath = "#{root}" + "#{modu}" + "#{INNER_PATH}" + "#{l}"
              filepath = "#{folderpath}" + "#{PATH_SUFFIX}"

              FileUtils.mkdir_p(folderpath) unless File.exists?(filepath)

              `mv My_App-Locale/#{language}/strings.xml  #{filepath}`
       end

Finally we delete the files that were downloaded/unzipped:

    `rm -rf My_App-Locale.zip`
    `rm -rf My_App-Locale/`
    `rm -rf __MACOSX`

To call this script, I used jruby/gradle plugin in the build.gradle file and passed the arguments to it. Using preBuild.dependsOn the task is called before every build which ensures all developers have the latest version of strings files.


import com.github.jrubygradle.JRubyExec
apply plugin: "com.github.jruby-gradle.base"

def UPDATE_STRINGS_SCRIPT_PATH = "${project.rootDir}/config/scripts/update-strings.rb"
def modulesNames  = 'app,lib_account' //comma separated with no space

task updateStringsFileFromLokalise(type: JRubyExec){

    script UPDATE_STRINGS_SCRIPT_PATH
    scriptArgs "${modulesNames}", "${project.rootDir}/"
}
preBuild.dependsOn(updateStringsFileFromLokalise)

Now you can add the strings files to your gitignore file and kiss strings conflicts goodbye!

Uncle Bob’s Clean Architecture on Android

A week ago I was challenged to understand and implement a sample app that applies the concepts introduced by Robert C. Martin “Uncle Bob” in what’s known as Clean Architecture.

WHAT’S THAT?
In brief, It’s a different approach of how you would design your app such that its modules become more independent and fully testable. I made some research that could help you get started understanding the concept. Here are some of my findings:

My SAMPLE APP
After finishing my research I started to work on this sample app. The idea behind is simple and fits beginners. The app simulates tracking the movements of a user and stores his location updates in a databases. It thus contains 3 main modules (+ a “common” one). The first is the App module which is the UI concern, the second is the tracking module which has the core business logic and final one is the storage module which deals with, obviously, storage.

One of the concepts behind Clean Architecture is that you system design should says what actually your app does and hence the top level naming I chose: app, tracking and storage. Now when someone looks into the project structure he can say: “Oh that must me a tracking app that stores tracking data”. The design expresses the business behind the app from a very high level.

structure


OUTER TO INNER
Another important concept here is that the outer modules should know nothing (or little) about the inner modules. Meaning that UI (app) should know nothing about BL (tracking) and the same goes for the tracking and storage modules.

Even the entities each module use should be different with mappers between each module to map an entity of one to and entity of another. This assures more separation of concerns. For e.g: We may need to add some “$” to a price field in a certain object before displaying it, where would we do that? In the entity of the UI module. Or may be our storage entities need to extend some base class that has common fields to parse a network response, why would this be applied to other modules? No need. Every concern should only care for the set of data that it uses and that’s it.

Of course To achieve so we’ll need mappers that map each concern’s module to another.

HOW CONCERNS SPEAK TO EACH OTHER
This is up to you really. You can use an Observer pattern or a Publisher-Subscriber pattern. Your call. In my sample, I use RxJava to let the presenters of the app concern talk to interactors (the actual use cases) in the tracking concern via a set of invokers. When interactors are done with the logic, invokers notify presenters which after update the UI.

The app concern uses a Model-View-Presenter pattern, the tracking concern uses the Observer pattern and the storage concern uses a Repository pattern to enable adding more repositories in the future besides the database.

A SAMPLE FLOW
Let’s take starting a new trip and storing its data as an exemplary flow. When a user starts a new trip, he enters a new name and his location (whether simulated or obtained by GPS).

The UI will call the TripPresenter’s startTrip() method:

presenter.startTrip();

The presenter will wrap the data in trip entity and instantiates a new StartTripInvoker

   new StartTripInvoker(new TripDBRepository(), newTrip) {
            @Override
            public void onNext(Long tripId) {

            }
        };

The invoker instantiates the StartTripUC which is an Observable and subscribes to it.

  public StartTripInvoker(TripRepository tripRepository, TripTrackingModel newTrip) {
        startTripUC = new StartTripUC();
        startTripUC.subscribe(this);

        startTripUC.start(tripRepository, newTrip);
    }

When the StartTripUC is done with the logic, it fires on Next to notify the subscriber/invoker

 @Override
    public void start(TripRepository tripRepository, TripTrackingModel newTrip) {

        if (tripRepository instanceof TripDBRepository) {

            //BL HERE
            fireOnNext(tripRepository.getTripId());
        }
    }

Of course you can have many invokers, so you need to notify them all

  public void fireOnNext(Object obj) {
        for (int i = 0; i < invokers.size(); i++) {
            invokers.get(i).onNext(obj);
        }
    }

Finally,the presenter orders the UI to do some stuff:-

   new StartTripInvoker(new TripDBRepository(), newTrip) {
            @Override
            public void onNext(Long tripId) {
                getView().clearEditTexts();
                getView().showAddedSuccessfullyMessage(tripId);
            }
        };

I’ve added a example of unit testing in the app module, however every concern can now be unit tested easily given how all of them are completely separate.

DESIGN
Here’s the design of the app(excuse my horrible handwriting and drawing).

unnamed


Model View Presenter for Android

While iOS developers mostly use the Model–view–controller (MVC) design pattern and Windows Phone developers use the Model–view–viewmodel (MVVM) pattern while developing their apps, we, Android developers, are left with no hint from Google. You don’t really know where to start, which architecture fits your app’s business needs or which pattern would let your project be sustainable and maintainable for long time.

Well, let’s think of this positively! You have some space to innovate here. For me I choose the MVP (Model-View-Presenter) design pattern (with some variations) for most of the apps I work on independently.

In this repository you’ll find a demo app that implements the MVP pattern. We’ll discuss it later.

WHY MVP?
Well for me, 2 reasons mainly:
– Needless to say, absolute separation between layers.
– Unit testing: Whether you’re doing a TDD or planning to unit-test some components of your app, MVP should be your choice, really.

MVP LAYERS
The MVP pattern consists of 3 layers. Obviously: a Model, a View and a Presenter layer. Ideally, a Model (I like to call it a Service because a model tends to be associated with data objects for e.g: UserModel, CarModel.. etc) does some certain business logic or a network request or whatever processing needed to done on some data. A View is resposnble for displaying your data in a nice way (well, this is up to the UX  team of course). And finally, a Presenter which acts as a messenger between the Model and the View.

THE DEMO APP
So the app has a BaseService, a BaseFragment and a BasePresenter, which respectivly represent the M, the V and the P.

The BasePresenter has a view of generic type which could be any fragment. A BaseFragment also has a presenter of generic type. And the BaseService has an instance of ServiceFinishedListener which is used to notify and pass a data object to the presenter whenever the business logic is done.

BasePresenter:

public abstract class BasePresenter<V extends BaseFragment> {

    V view;

    protected V getView() {
        return view;
    }

    public void initView(V view) {
        this.view = view;
    }

}
 

BaseFragment:

public abstract class BaseFragment<P extends BasePresenter> extends Fragment {
    protected P presenter;
    View rootView;

    @Nullable
    @Override
    public View onCreateView(LayoutInflater inflater, ViewGroup container, Bundle savedInstanceState) {
        rootView = inflater.inflate(getLayoutId(), container, false);

        if(presenter == null)
        {
            presenter = createPresenter();
            presenter.initView(this);
        }
        return rootView;
    }

    protected abstract P createPresenter();

    protected abstract int getLayoutId();
}
 

BaseService:

public abstract class BaseService {

protected ServiceFinishedListener serviceFinishedListener;

public BaseService(ServiceFinishedListener serviceFinishedListener) {
this.serviceFinishedListener = serviceFinishedListener;
}

public abstract void startService(Bundle b);

}

EXTENDING THESE GUYS
Now, to test this I made an IncrementService, IncrementPresenter, and InrcrementFragment who extend the base classes.
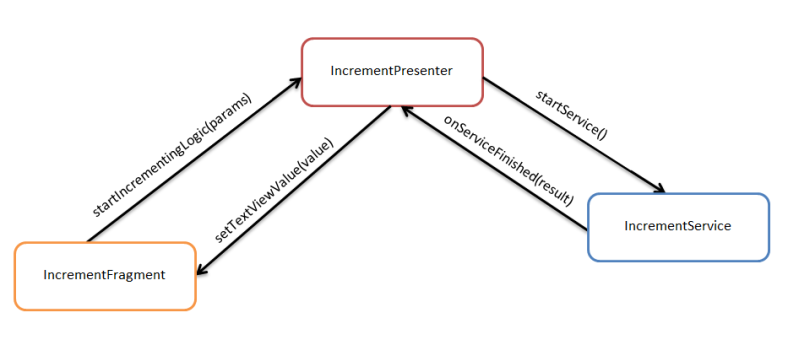
If a user presses on the Increment button in IncrementFragment (view) it wraps the parameters in a bundle, sends it to the presenter and tells the presenter to startTheIncrementingLogic(bundle).

  presenter.startIncrementingLogic(b);


The IncrementPresenter (presenter) starts a new instance of the IncementService (model) and passes the bundle to it (It can call any number of services that do many llogic). It also subscribes for the ServiceFinishedListener to get notified when the service is done with its logic.

public void startIncrementingLogic(Bundle b) {
    IncrementService incrementService = new IncrementService(new ServiceFinishedListener<IncrementResult>() {
        @Override
        public void onServiceFinished(IncrementResult result) {

        }
    });

    incrementService.startService(b);
}

When the IncrementService is done (it basically adds 1 to some Integer(input), it calls the listener and passes the result object back to the presenter:


@Override
public void startService(Bundle b) {
    int value = b.getInt(BundleConstants.VALUE_TO_INCREMENT);

    value = doIncrementLogic(value);

    IncrementResult incrementResult = new IncrementResult();
    incrementResult.setValue(value);
    serviceFinishedListener.onServiceFinished(incrementResult);
}

private int doIncrementLogic(int value) {
    return value + 1;
}
 

And finally, a presenter would give an order to the view to set the value of a TextView. The IncrementFragment is dummy; it just follows the IncrementPresenter's order.

@Override
public void onServiceFinished(IncrementResult result) {
    getView().setTextViewValue(result.getValue());
}
 

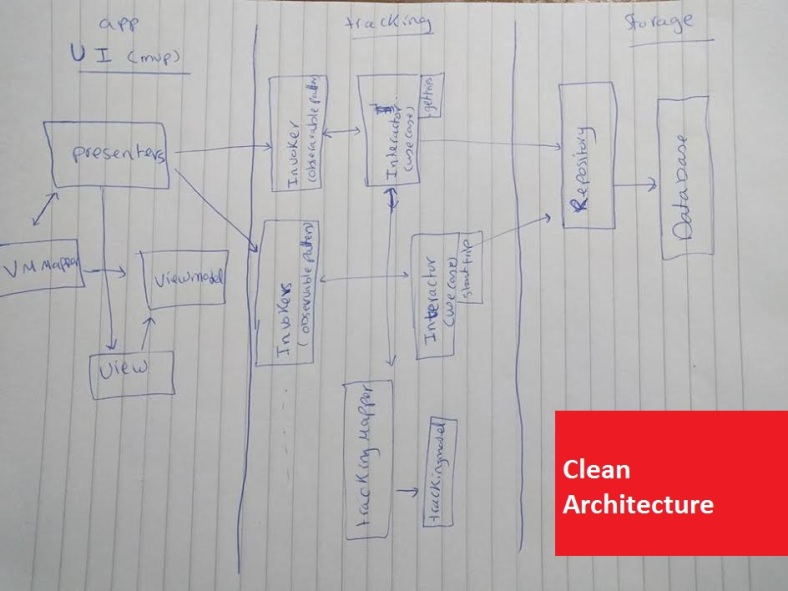
Here's a chart for the three components speaking to each other to get the job done (and yes, I suck big time in drawing):


Screenshot 2016-01-14 20.33.01 (2)

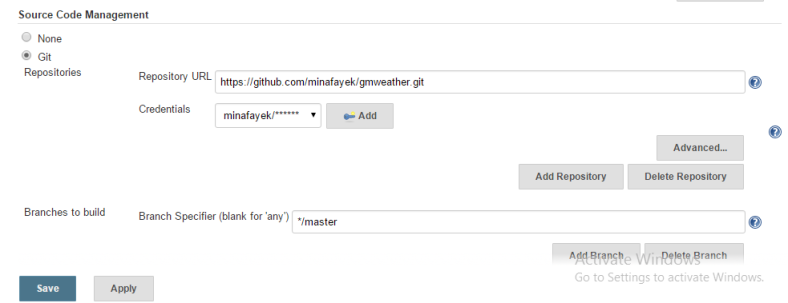
Again, here's the demo app on Github: https://github.com/minafayek/MVPAndroidDemo

Happy Coding, for real!

Jenkins, Fastlane, Crashlytics, Gradle and Slack — All together

jenkins-crashlytics-fastlane-slack

Our team wanted to have a more automated way of releasing builds particularly for the testing team and our client for UAT testing. We previously used Crashlytics Beta and somehow liked it so we wanted to keep it besides adopting Jenkins. How did we achieve that? Fastlane.

Fastlane is set of tools for continuous integration and development. It initially supported iOS automation but later also supported gradle for Android development.

We needed to do two things basically with every build besides sending email notifications to the testers:

  • Send notification on Slack builds channel.
  • Upload the APK built on Jenkins with a certain flavor to  Crashlytics Beta.

First, we need to define a lane with the gradle build variant or flavor we want to release:

lane :quality_control do
gradle(task: "assembleQualityControlFlavorRelease")

We will later call this lane from the sell command in Jenkins.

SLACK
For slack, we defined our hooks URL for the channel we wanted to send a notification to. You get the URL here.

default_platform :android
platform :android do
before_all do
ENV["SLACK_URL"] = "SLACK HOOKS URL"
end

And to actually send the notification on a specific channel:

slack(channel: "#android-builds",
message: "QC build  has been uploaded successfully",
default_payloads: []
)

CRASHLYTICS
You need to have a Crashlytics api token and build secret. Also, you need to know the path to where Jenkins uploads the build after a job is done. You then put down the groups that you want to notify when a new build is ready (groups should be defined from Crashytics Beta, you just reference them here). And finally, add some build notes:

crashlytics(
api_token: "API TOKEN",
build_secret: "BUILD SECRET",
groups: "android-developers, de-testing",
notes: "QC environment",
apk_path:"/Applications/jenkins-1.617-0/apps/jenkins/jenkins_home/jobs/....."
)

RUNNING ALL THIS
The final step is to go to the Build section section in the project configuration on Jenkins and actually call the lane via this Shell command:

chmod +x gradlew
#!/bin/bash -l
echo q6jwsn6dytu | sudo -S gem update fastlane
fastlane quality_control

Now every time a new build is created, this line will trigger the whole process of uploading to Crashlytics and notifying slack channel.

A/B testing on Android using Taplytics

I was recently asked if I have any experience with A/B testing. I absolutely knew nothing about it so my answer was a straight no. I took notes and put on my list to explore what’s that later.

A/B TESTING
In short, A/B testing is simply running two variants of the same app against each other to determine which is better in terms of performance and look and feel.

This change could be simply changing some font or color of a view or could be a total redesign, but all serves the same purpose, going for a better choice.

USING TAPLYTICS FOR A/B TESTING
TAPLYTICS  would simply help you to do so. Sign up and select Add app from the dashboard, put some name and press Create App.

taplytics-add-app

Now in Android Studio, open your module’s gradle and add:

 repositories {
     maven { url "https://github.com/taplytics/Taplytics-Android-SDK/raw/master/AndroidStudio/" }
 }

And:


dependencies {                                                                   

     //Dependencies for taplytics
    compile("com.mcxiaoke.volley:library:+")

    //Excluding org.json to use Android version instead
    //socket.io connections only made on debug devices.
    //To make live changes on a release build, remove the `debugcompile` flag
    debugCompile('io.socket:socket.io-client:+') {
        // excluding org.json which is provided by Android
        exclude group: 'org.json', module: 'json'
    }

    //Taplytics
    compile("com.taplytics.sdk:taplytics:+@aar")

    // Dependencies for Taplytics
    compile("com.mcxiaoke.volley:library:+")
    compile("com.squareup.okhttp:okhttp-urlconnection:+")
    compile("com.squareup.okhttp:okhttp:+")
    //Excluding org.json due to compiler warnings
    compile("com.github.nkzawa:socket.io-client:+") {
        exclude group: "org.json"
    }
    compile("com.github.nkzawa:engine.io-client:+") {
        exclude group: "org.json"
    }
 }

TWO MORE STUFF
Now you need to get the API key and the URL scheme.

keys.png
From the dashboard, go to settings copy the TAPLYTICS IOS / ANDROID SDK KEY  and place it in you extended application class:

public class GMApp extends Application {

    @Override
    public void onCreate() {
        super.onCreate();

        Taplytics.startTaplytics(this, "b8500736bcbb43641f0e8a890d2119dc413b2227");

    }

}

Copy the TAPLYTICS IOS / ANDROID URL SCHEME and place inside your main activity’s tag in the AndroidManifest.xml file

  <action android:name="android.intent.action.VIEW"/>
                <category android:name="android.intent.category.DEFAULT"/>
                <category android:name="android.intent.category.BROWSABLE"/>
                <data android:scheme="URL SCHEME HERE"/>

CONNECTING TO YOUR DEVICE
From the dashboard, go to experiments on the left, click Create New Experiment on the far top right:

taplytics-new-experiment

Now run the app, Taplytics will detect your device presence whether it’s an emulator or an actual device:

pairing.png


Click check your device and you’ll get a popup dialog in your app to connect it to Taplytics. Press Yes.

paired.png

And we’re connected! In the next post, I’m going to explain how to start picking elements and making variants of them.

Jenkins meets Git

In my last post, I’ve installed Jenkins on my Windows PC. In this one, I’ll discuss how to connect GitHub to Jenkins.

  • First, download and install Git on you PC.
  • In you browser type http://localhost:8080/. Select Manage Jenkins, then Manage Plugins.
  • Go to Available tab and look for “GitHub Plugin”, click “Download now and install after restart”.
  • When it’s done, verify the plugin is installed from the “Installed” tab:jenkins-github-plugin-installed (2).png
  • Now go to Configure System from Manage Jenkins. Scroll down to Git and make sure the “Path to Git executable” points correctly to git.exe.

Adding a GitHub repository:

  • Now go to Jenkins home and select Create new jobs.
  • Type your project/job name and select Freestyle project, click OK.
  • In the next page, scroll down to Source Code Management and select Git.
  • Put your Git repository URL and add credentials and click save.github-jenkings_credentials.png

Now go to http://localhost:8080/job/[projectname] and click Build Now  and you have your fresh, github-synced build!


Installing Jenkins on my old Windows PC

Lot’s of my colleagues have been talking about Continuous Integration (CI) recently at work specifically using Jenkins. I have on old PC (everyone has) that I use as a server for hosting websites and web services, so why not host Jenkins as well?

In case you haven’t heard about the Jenkins or the CI concept itself, here’s how they put it:

In a nutshell, Jenkins is the leading open source automation server. Built with Java, it provides hundreds of plugins to support building, testing, deploying and automation virtually any project

 Now to the steps:
  • Clean up your old PC, you must have  abandoned it after buying your laptop.
  • Make sure it has Java 1.5 or more. No need for windows server by the way, my PC is running Windows 7 professional.
  • Click here and download the windows version from Native Packages section.
  • Just follow the instructions until installation is done. After that, it’s done you can access it by opening http://localhost:8080/ in your -now server PC – browser or http://[ServerIP]:8080/ from any other PC connected  to the network.

Screenshot 2016-01-01 17.58.00.png


Now to verify if Jenkins is running, open your windows services and look it up.

Untitled.png

And congrats, we have Jenkins at home!

Next step, adding some configurations and plugins.

My Android Third Party Gang

These are some kick-ass third party libraries that I almost, for now, start every new project with. I think for the time being, everyone should use them to save time and get high performance.

IMG_20151231_123559~2-01

RETROFIT
The most powerful library for handling network requests I’ve worked with so far. It will guarantee you have clean coding totally separating your network layer from the UI and business layers.

As Square puts it on the website it “turns your HTTP API into a Java interface”. Nice and easy.

Let’s say we’re trying to call a REST API to get some data about weather, the interface would look like:


public interface WeatherEndPointInterface {

@GET(&quot;data/2.5/weather&quot;)
Call getWeatherByLocation(@Query(&quot;lon&quot;) String lon, @Query(&quot;lat&quot;) String lat);

}

The resource url is added as an annotation and the parameters are passed annotated as query objects. The base URL has been provided during the initialization of our retrofit instance (which could be a singleton):


Retrofit retrofit = new Retrofit.Builder()
.baseUrl(&quot;http://api.openweathermap.org/&quot;)
.build();
}

Interface Usage:
Now to actually call the API all we need to do is:


Call call = weatherEndPointInterface.getWeatherByLocation(lon, lat);
call.enqueue(new GMCallBack() {
@Override
public void onResponse(Response response, Retrofit retrofit) {
weatherData = response.body();
}

});

Retrofit 2 gives you the option to integrate with many parsing libraries suck as Gson, Jackson and others . The most powerful addition to Retrofit 2 ability to cancel requests which wasn’t there in 1.

Needless to say, you can extend the you can have your own extended call back class to have some centralized error handling.

Retrofit is a super time saver!

GSON
I mostly use Gson With Retrofit as a model parser (Conversion Factory). But to use it separately as well can’t be more easy.


//to

String json = new Gson().toJson(configModel);

//from

ConfigModel configModel = new Gson().fromJson(jsonStr);

BUTTER KNIFE
Butter Knife binds your views in a layout (activity, fragment, custom view.. etc) and casts them to corresponding fields.

Basically of placing 10s of lines for just initializing the UI  components using the hideous findViewById, you just need to annotate the field with resource id:

@Bind(R.id.fragment_city_name_textview)
TextView nameTextView;

You just need to initialize Butter Knife itself on creating your view (having a parent view that does this for all is optimal):

ButterKnife.bind(this);

Next? use your views!

You can also use it easily with adapters using the ViewHolder pattern:

static class ItemViewHolder
{
@Bind(R.id.item_menu_city_textview)
TextView cityTextView;
public ItemViewHolder(View view)
  {
   ButterKnife.bind(this, view);
  }
}


EVENTBUS
EventBus a publish/subscribe library that facilitates communication between different app components, basically anything that extends object class be it an activity, a fragment, a service, or any other type.

If a component needs to subscribe it has to register itself:

EventBus.getDefault().register(this);

To listen:

public void onEvent(Object&amp;amp;amp;amp;amp;amp;nbsp;obj) {

}

Publishing:

 EventBus.getDefault()
 .post(object);

And finally to unregister self:

EventBus.getDefault().unregister(this);

My own implementation usually involves putting these lines in the base component. For e.g, If  I have a BaseFragment it would register and unregister in onStart() and onDestroy() methods, respectively. A BaseService would have a notify method that publishes according to data provided by child services and so on.

Communication made easy!