HTML input and boolean values

This is so outrages.

Try showing a boolean value in HTML and it won’t show!

  <input type="text" id="isNotificationRead" value="@Model.is_read" /> 


Instead, you’ll get ‘value’ if true and empty if false.

Untitled


Frankly, I don’t know if this is related to MVC.NET or it’s genuinely a HTML problem. Anyway, to solve this add toString().

  <input type="text" id="isNotificationRead" value="@Model.is_read.ToString()" /> 


Voilà, problem solved!

El7a2: My first commercial Android App

El7a2 is an Android application that provides user with the latest offers and discounts by various set of brands and restaurants in different categories.

Technologies & Tools used:

  • WCF (.NET 4.5/VS 2012) for the Web service.
  • MS SQL Server 2012 for the database.
  • IIS 7.5

Libraries used:

Current features:

  • Browsing offers under brands categories by type.
  • Special offers introduced at the first tab for promoted vendors.
  • Searching by brand name.

Future thoughts for the App:

  • Web portal for the vendors.
  • Rating for offers.
  • Location-Based Marketing

Truth is, I learned a lot and I enjoyed a lot developing El7a2.

Why I disposed WebApi and reverted back to WCF

I was so excited about WebApi when I first heard about and immediately decided that my next SOA project should be implemented using it. But later on I was so frustrated when it came to publishing my service and spent like 2 weeks trying to figure out what’s wrong.

Publishing on IIS:
Seriously, what’s wrong with publishing on IIS? I added a custom action in my controller and almost tried everything yet it kept giving me the 404 error.

Here’s what I’ve tried so far after some googling:

  • Adding ActionName annotation above my custom action:

[ActionName("api/Offers/brands/{brandID}")]

  • Registering a new route with customized parameters that fits my action on RouteConfig.cs:

routes.MapHttpRoute(
name: "GetOffersByBrandID",
routeTemplate: "api/Offers/brands/{brandID}",

defaults: new { category = RouteParameter.Optional, controller = "Offers", action = "GetOffersByBrandID" }
);

  • Adding runAllManagedModulesForAllRequests node to web.config:

<modules runAllManagedModulesForAllRequests="true">

  • Making sure that routing & redirection is enabled on my IIS.

Unfortunately, none of the above proposals worked and I never managed to call my custom action from my domain or through IIS browsing and it only kept giving me the lovely 404 screen.

To save my project I had to step back to and rebuild my service using WCF. However, I won’t stop looking for a solution.

Sending parameters from Android client to WCF service

In the previous post, I discussed how to consume a WCF service from an Android client. In this post I’m going to explain how to pass parameters from the client to the methods exposed in the service and then receive the data intended.

The parameters are passed through the URL, so we need to add a new method with a modified UriTemplate: On IPersonService interface add method GetPersonsDataJSONByID():

        [WebGet(UriTemplate = "/personsdataJSONByID?ID={id}",
         ResponseFormat = WebMessageFormat.Json)]
        [OperationContract]
        Person GetPersonsDataJSONByID(int id);

The personsdataJSONByID?ID={id} annotation will allow us to pass ID to the method through the service URL. On PersonService.svc.cs add GetPersonsDataJSONByID implementation:

Person GetPersonsDataJSONByID(int id)
{
Person p1 = new Person();
p1.ID = 1;
p1.Name = "Mina";

Person p2 = new Person();
p2.ID = 2;
p2.Name = "John";

Person p3 = new Person();
p3.ID = 3;
p3.Name = "Paula";

List persons = new List();
persons.Add(p1);
persons.Add(p2);
persons.Add(p3);

return persons[id – 1];
}

Same as GetPersonsDataJSON(),GetPersonsDataJSONByID() creates a list of persons on the fly, yet this time we’ll only return the person with the ID passed. Now let’s run and send ID = 2 through the URL: jsondata

Now on the client modify the UI to let the user enters an ID:

New UI

New UI

Now, not much modification needed, when button GetDataByID is clicked, append the parameter and the value to the URL before executing:


EditText etID = (EditText)findViewById(R.id.etID);
 int id = Integer.getInteger(etID.getText().toString());

 StringBuilder strB = new StringBuilder();
 strB.append(URL);
 strB.append("byID?ID=");
 strB.append(id);

And the output is:

Happy Coding 😉

Consuming IIS-published RESTful WCF service from Android over WiFi

In this post I’m going to explain how would you consume a WCF service published on IIS on your local machine from an Android app on a device connected to local WiFi.

Before we start 3 prerequisites are needed:

  • Basic knowledge of Android development.
  • Knowledge of WCF services and SOA architecture.
  • Basic knowledge of JSON data interchange protocol and format.

HOWEVER, I always believe in upside knowledge gain in software development; just try to code something even of you don’t understand much about .. you’ll get the big picture later.

Let’s start!

  1. The service:

The service we’re building is a very simple one. It will provide some data about people ( just ID’s and Names).

  • Create a WCF Service application on Visual Studio call it “PersonsService”.
  • We’re using REST module for building our service so on the Web.config file, remove the <system.serviceModel> tag with all of it’s contents.
  • Right click on PersonsService.svc –> View Markup and add the following line to the <servicehost> tag:

Factory ="System.ServiceModel.Activation.WebServiceHostFactory"

Congratulations we now have a REST service, let’s start to make it useful for anything!
On IPersonsService.cs, you’ll find the Interface which will expose our methods and a class which acts as a data contract:

Rename the class to Person, remove the existing fields and add ID and Name Fields. It should look like this:


[DataContract]
public class Person
{
int id;
string name;

[DataMember]
public int ID
{
get { return id; }
set { id = value; }
}

[DataMember]
public string Name
{
get { return name; }
set { name = value; }
}
}

Next, clean everything at the interface “IPersonService” and add a  GetPersonsDataJSON() method that returns a list of persons:


[ServiceContract]
 public interface IPersonService
 {
 [WebGet(UriTemplate="/personsdataJSON",
 ResponseFormat=WebMessageFormat.Json)]
 [OperationContract]
 List GetPersonsDataJSON();

}

Notice the “WebGet” annotation above the method, this actually says 2 things:

  1. ResponseFormat=WebMessageFormat.Json: which means that we would like to use the JSON protocol for exchanging the data between our service and our client.
  2. UriTemplate=”/personsdataJSON”: means that the data formatted in JSON will be under the /personsdataJSON.

If we needed to provide data in XML format for some reason instead, we would add a new method to the IPersonService interface called  GetPersonsDataXML() with UriTemplate=”/personsdataXML” & ResponseFormat=WebMessageFormat.XML.

One step for the end, on PersonService.svc.cs inherit the IPersonsService and implement the GetPersonsDataJSON method. Should look like this:


public class PersonService : IPersonService
 {
 public List GetPersonsDataJSON()
 {
 Person p1 = new Person();
 p1.ID = 1;
 p1.Name = "Mina";

Person p2 = new Person();
 p2.ID = 2;
 p2.Name = "John";

Person p3 = new Person();
 p3.ID = 3;
 p3.Name = "Paula";

List persons = new List();
 persons.Add(p1);
 persons.Add(p2);
 persons.Add(p3);

return persons;
 }

}

And the service is ready!

  1. Publishing on IIS:

This should be the easiest part: Right click on your project –> Properties –> Web –> select Use Local IIS Web Server and make sure Use IIS Express is unmarked then press Create Virtual Directory:

Properties

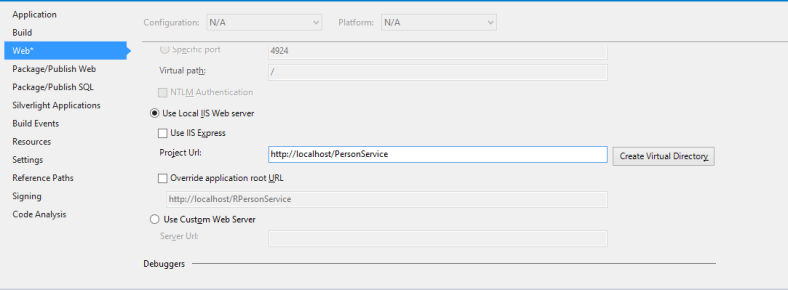
Web tab on project properties

Note: You should be running Visual Studio as Administrator to be able to create the publish the service on IIS.

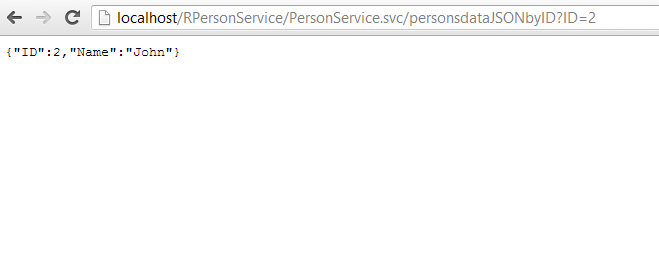
Now open IIS Manager, the service should be under Sites/Default Web Site .. Right click on it –> Manage Application –> Browse. You should see your project listing opened on your browser. Add /PersonService.svc/personsdataJSON to the path, so it should be:

http://localhost/PersonService/PersonService.svc/personsdataJSON

And the data should be returned on JSON format:

JSON formatted data

Note: Make sure to grant full control permission for IIS_IUSRS on the Web.config from properties & also on the PersonsService application on IIS through: Right click –> Edit Permissions –> Security tab.

  1. The Client:

UI: Well this is just a simple example to prove the concept, so let’s keep it simple. Here are the views:

  • Place a list view that displays names.
  • A button titled “Get Data”.
  • A TextView as a title for the list.

It should look something like this:

Client UI

As for the client logic there are 3 main components:

  1. Initialization
  2. Getting the data
  3. Extending AsyncTask to work asynchronously

1- Initialization:

  • We need to initialize an instance of HttpClient which will help us to execute HttpGet which holds the service URL which returned the data previously when we ran it on browser.
  • An instance or JSONObject which will hold the returned data.
  • A string for the URL of the service

HttpClient client;
 final static String URL = "http://192.168.1.6/RPersonService/PersonService.svc/personsdata";
 JSONObject json;

Inside the onCreate method place:

client = new DefaultHttpClient();

2- Getting the Data:

Now add another method and call it getPersonsData(). This method will do the following:

  • Create an instance of HttpGet and give it the URL of the service.
  • Use the HttpClient we created to execute HttpGet and return a response.
  • Check the response status if it’s success, then starts filling the data in a JSONArray and returns it.

Code:

public JSONArray getPersonsData() throws ClientProtocolException, IOException, JSONException
	{
		HttpGet get = new HttpGet(URL);
		HttpResponse response = client.execute(get);
		int status = response.getStatusLine().getStatusCode();

		if(status == 200) //sucess
		{
			HttpEntity e = response.getEntity();
			String data = EntityUtils.toString(e);
			JSONArray personsData = new JSONArray(data);

			return personsData;
		}
		else
		{
			Toast.makeText(this, "error", Toast.LENGTH_SHORT);

			return null;
		}

	}

3- Extending AsyncTask to work asynchronously:

Add a new class called ReadData and set it to extend AsyncTask class. AsyncTask class let’s us generically specify the data structure we’re going to convert the JSONarray to, here we’ll use an ArrayList<String>.

Code:

public class ReadData extends AsyncTask<String, Integer, ArrayList>
	{
		@Override
		protected void onPostExecute(ArrayList data) {

			 ArrayAdapter arrayAdapter =
			         new ArrayAdapter(getApplicationContext(),android.R.layout.simple_list_item_1, data);
			         lstView.setAdapter(arrayAdapter);
			super.onPostExecute(data);
		}

		@Override
		protected ArrayList doInBackground(String... params) {
			try {
				JSONArray personsNames = getPersonsData();
				ArrayList persons = new ArrayList();

				for(int i=0; i< personsNames.length(); i++)
				{
					persons.add(personsNames.getJSONObject(i).getString("Name"));
				}

				return persons;

			} catch (ClientProtocolException e) {
				// TODO Auto-generated catch block
				e.printStackTrace();
			} catch (IOException e) {
				// TODO Auto-generated catch block
				e.printStackTrace();
			} catch (JSONException e) {
				// TODO Auto-generated catch block
				e.printStackTrace();
			}
			return null;
		}

	}

ReadData class contains two overridden functions:

  • doInBackground: Will call the getPersonsData and encapsulates the returned JSON data into an ArrayList<String>
  • onPostExecute: Will take the ArrayList<String> formatted data and place it in the UI (ListView).

Notice that the returned data type from doInBackground must match with the data type of the parameter passed to the OnPostExecute method.

At the button click event of button Get Data we will use the ReadData class as follows:


new ReadData().execute();

One last thing, on AndroidManifest.xml  add this line which will give permission to the app to use the internet/WiFi:

<uses-permission android:name="android.permission.INTERNET"/>

Now disable your Windows firewall,  Run & press Get Data!:

Your android client is consuming your WCF service!

Happy Coding! 🙂

BTranslator

BTranslator is a WPF application that translates text using Bing translator via Bing API 2.0. Bing API provides translation (as well as other services) using 3 data exchange protocols: JSON, Xml & SOAP.

BTranslator let’s the user chooses between the three protocols.

BTranslatorLib consists of three classes JSONTranslator, XmlTranslator & SOAPTranslator. They all implement IProtocol interface which has one function called Translate.

Translate takes 3 parameters: Text to translate, from language & to language and then uses these parameters according to the protocol’s structure.

Download BTranslator – 694 KB

*Further explanation might follow

Simple web browser using C++/CLI

Lately I became interested in C++ so much .. I started reading from where we stopped at college and also started learning some related technologies like C++/CLI & MFC which are used to develop windows applications using C++.

Anyway, this one of the simplest applications that you would do if you’re a C++/CLI beginner ( may be with some C# windows programming background)

Open your Visual Studio -> New Project -> Visual C++ -> Windows Forms Application

This looks pretty much like C#, the same controls on the toolbox & the same initial form .. even if you pressed Right Click -> View Code, you’ll find the same stuff that you find in C# forms except that the designer code & the code you’re going to write are on the same file.

Now go to the toolbox & and grab a Menu Strip then add 3 buttons & a TextBox inside it The user should enter the Url in the TextBox .. and then press Go To .. We’ll also have Forward & Back buttons.

Then add a web browser control under the Menu Strip .. It should look something like this:

Now let’s add some functionality for this .. Double Click on the Go To button and inside the click event handler write:

webBrowser1->Navigate(txtUrl->Text);

The Navigate function takes the text written in the textbox & ‘navigates’ to it.

Pause: Selection Operator (->):

>Now you might want to ask about the difference between the selection operator (->) & the dot (.) which is also used to access public members/functions of a class.

Well, it’s simple .. assume that we have class Student & that we created these instances:

Student stud

Student *studPtr = &stud;

Student &studRef = stud;

So we have stud (an object of Student), studPtr (a pointer to a Student object)

& studRef (a reference to a Student object)..

Assume further that Student has a Name which is a public member..

So if you want to access Name in the three cases this would be:

stud.Name = “name1”;

studPtr->Name = “name2”;

studRef.Name = “name3”;

That is, when you’re accessing public class members/functions of pointers to objects you use -> while a dot (.) is used if you’re dealing with an instance or a reference to an object of a class .. easy!

Back to our browser:

Do the same double click with the Forward/Backward buttons to create their event handlers ..

We’ll just call the GoBack() & GoForwad() functions found inside the webBrowser1

Browse!

Now let’s run and start some browsing ..

Learning Xna

Yesterday, We made our first rehearsal for the Xna workshop we’re preparing to present in COMPASS’10 … hmm .. I think things went well..

I can’t really remember how it started with Xna and who exactly told me about it .. nah .. this is out of my memory range! .. though I think it was around the end of the second semester in third year .. yeah probably that’s when I started to read about it ..

One of the main reasons I got into FCIS was game development .. this one question:” How do they make these games?”  kept flowing all the way .. this is also why I’ve chosen SC 😉

I don’t mind working with OpenGl or DirectX at all .. even though OpenGl was disastrous last year! .. It’s just that I nearly taught myself everything about Xna and that was completely new to me .. I’ve been interested in enhancing my technical skills!!

Anyway .. We still have too much work to do preparing the workshop .. I hope things go right!